Wednesday, September 2, 2015

A Skin-saver! | Simple "Replenishing Rich Moisturizer"

Hey there! So, it's been a month. I was kind of feeling "blah" and I didn't really have anything to post about. I was scrambling for a minute before I just told myself to chill and take my time. I'll get to it when I get to it.

I was dog-sitting for my friend this month for 11 days, and I didn't have any toner or moisturizer to take with me. My mom had gotten some free Proactive from a friend so I grabbed some. I tried Proactive once before when I was about 13 or 14 and it actually made me break out. I thought it had been a while, and maybe my skin would take it differently this time around. It did, but not in the way I had hoped! I ended up having somewhat of an allergic reaction to it. It made my skin itch like crazy, and it dried it out too. Not horribly so, but it was pretty dry.

I looked up some moisturizers online, settled on this one, and went and bought it at my local grocery store. I also picked up some Burt's Bees Garden Tomato Toner to help kill whatever was causing this reaction naturally. I only used my usual face wash, the toner, and moisturizer for a few days while my skin calmed down, and then I used my normal face scrub and exfoliated my face really well.

That combo literally saved my skin. My face felt amazingly smooth after, and because Simple products have no dyes, perfumes, or harsh irritants it didn't cause me to break out either. And as for Burt's Bees, I've been a fan for a long time.

It says "rich moisturizer" and that made me a little leery because I have oily skin, but it didn't mess with my skins natural oil production. I could not recommend this stuff more! I'm definitely going to be looking into more of the Simple skin products!

Until next time,
Abby

Wednesday, August 5, 2015

Naked Smoky | Swatches & First Impression

~Happy Birthday to Me, Happy Birthday to Me...~

Hello, everybody! It was my 22nd birthday on Monday! (August 3rd) My mom got me the Naked Smoky palette as a present. I know I'm a little late to the game and there are loads of reviews and swatches out there, but I wanted to put this out there anyway.

One of the most satisfying thing about the packaging is the magnetic closure. It's a weird quirk I have. It's just satisfying to see and hear. This palette is GORGEOUS! The color range is perfect for versatile smoky eyes rather than the typical, plain black option. There are endless color combos from bronze to grays, taupes, and blackened shades. There are "...nine never-before-seen shades and three exclusives from past palettes." And for the first time in a Naked palette the brush is different! Rather than a blending side and a flat side to the brush, this time it has a tapered blending and a smudging brush. The palette also comes with a diagram with 4 different eye looks, and it tells you how to achieve the looks.

The texture of these eyeshadows are amazing. They're so smooth and buttery, and so pigmented! For me 2 of the 12 eyeshadows are almost like "nothing" shades because I have such fair skin, but those kinds of shades are perfect for blending out the darker, "harsher" shades. So without further ado, here are my swatches. (I fake tanned for my birthday weekend, so my skin isn't as pale as it normally is in these pictures.)

First four shades:
Second four shades:
Last four shades:

Now, as far as recommending this palette...I don't think I would tell beginners to go out and buy this. At least not until they had a little more experience. Smoky eyes aren't easy. They can come out looking like a racoon. But for a person with a bit of experience, and confidence, I would definitely recommend this palette!

I know Naked palettes are known for being expensive, they retail at $54. But if you were to divide 12 shadows into $54 it comes out as $4.50/eyeshadow. They're actually a decent value, and you'll have them around for a while.

Until next time,
Abby

Sunday, July 12, 2015

My Hair Journey Pt. 1 | First Stages

If you've read my post about hair extensions (part 1), then you have a basic rundown of my hair. If not, I have thick, coarse extremely dark brown hair that has red and gold tints to it. It's oily, but my scalp is also very sensitive, dry and prone to some pretty bad dandruff. I've only ever dyed my hair once (black) and bleached 2 small sections, all of which has been grown out and cut off years ago. So starting this journey to blonde hair I started out with virgin* hair.
To start off: I AM NOT A PROFESSIONAL HAIR DRESSER! I only have basic knowledge that I've learned from my sister and the Internet. THIS IS NOT A TUTORIAL, just what I did to my own hair. DO NOT EXPECT IDENTICAL RESULTS IF YOU ATTEMPT THIS! This is just my personal hair journey and I'm only posting it as documentation for myself and if any of you are curious.
Also, if you are using bleach you will damage your hair. There is no avoiding it. My hair was in good condition, and I still had to cut about 3 or 4 inches off. I knew I would need to, but I also wanted to.

Technically this was a two-day process, but in total it only took a couple hours. I bought everything at Sally Beauty Supply. I went in with general knowledge and also asked the ladies working there for some advice. I got 30 volume developer and blue powdered bleach, and my hair color. I decided to go for an ash and neutral blonde because I have red and gold in my hair and the ashy/neutral tones would counteract it somewhat.
I enlisted the help of my sister and best friend, and together with my instruction we bleached my hair! When bleaching hair, you have to start at the ends. The farther away from your scalp, the longer it takes to process. Your scalp is a "hot spot" and the bleach will develop a lot faster! We didn't do the roots until about 5-10 minutes before we had to rinse the bleach, and we were checking it constantly.
We rinsed it out and used some purple conditioner, and it cut down on the brassy tones really nicely. Not like a toner would, but my hair was not light enough to tone. I didn't want to bleach my hair more than once, and I knew it wouldn't go platinum on the first try. I knew going blonde would be a process.
Next we went over my hair with the dye. I completely spaced on getting a lower level developer for the color and so I used my 30 volume (which lifts as well as colors). I got a level 8A(ash) and a level 8N(neutral) dye. I also used a color correcting additive to cut down red tones. We did the color the same as the bleach, ends to roots. I let the color develop and then rinsed with purple conditioner again.
Looking back, I would have used a lower developer and gone roots to ends because my roots turned bright YELLOW! The length of my hair was a nice color, but man those roots!

I went to bed and let my hair rest a bit, and then the next day we went back to Sally's and bought more dye and a 10 volume developer. I also decided on a level darker in color because my roots were so bright. I got some level 7N dye and a Red/Gold color correcting additive to cut down on the brassy tones. We applied it all over the roots and then went back and brushed it through the length a bit to blend everything together. I let it develop for 30 minutes and then rinsed. I didn't have the purple shampoo with me this time, but I only used the tiniest bit of shampoo and slathered on the conditioner.
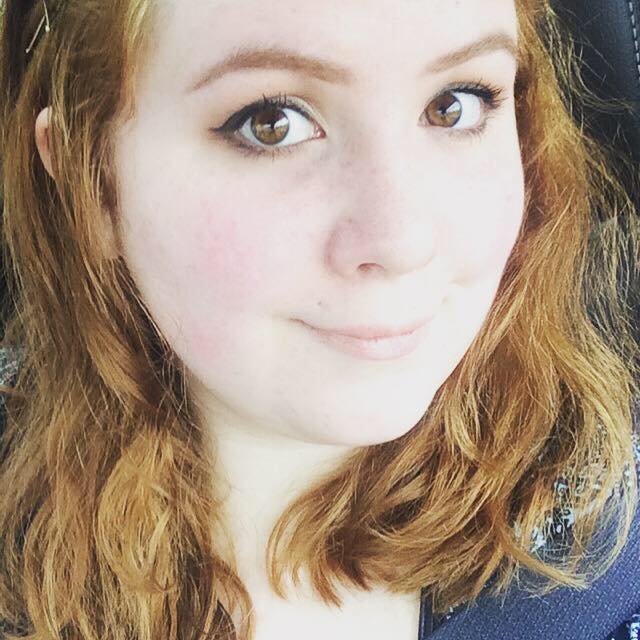
It looks so much better now! It's a smidge on the brassy side, but I bought my own purple shampoo, so those tones will go down in time. The color turned out to be a medium-dark neutral blonde, but there's a small hint of red to it.

My hair is still in really good condition considering I bleached my hair blonde in one day. Only the very top layer is frazzled, but with some good, deep conditioning masks it'll be ok eventually.
Product List and Links:
Shimmer Lights: Shampoo

Levels I bought: 1 Level 8A, 1 Level 8N; 2 Level 7N

I hope you guys found this interesting, and helpful if you are on the same journey as myself. I did a lot of research before I started to consider going blonde. I came from pretty much a level 2 brunette shade and went all the way to a level 7/8 blonde. I'm still not done, but I'm really loving where it is at right now.

Until next time,
Abby

Hair Journey Part 2?

*Virgin Hair means untreated, unprocessed, natural hair.

Saturday, June 20, 2015

NYX Cosmetics | "Invincible Fullest Coverage Foundation"

With my recent fake tanning experience, I knew I would end up needing new face makeup. All my years of wearing makeup has been geared towards buying the lightest shades of anything and hoping it works. And once I would find a "holy grail" it became a staple. But now with my tan I know nothing about tan makeup and what would work. So I enlisted the help of my best friend and we went shopping, and I found this beauty!
I have sensitive, combination/oily skin, and I love me a matte finish. I also have rosacea, which makes finding a foundation that covers and blends well a little difficult. I typically have to get "full coverage". With my tan, it's a little bit less noticeable though. I got it in the shade #5 Light/Medium.
This stuff is pretty amazing. I applied it twice, two days in a row. The first time I used my fingers, and the second time I used a damp beauty sponge. Both ways were effective, and it blended like a dream!
The second day I applied the foundation, I put it on around 8:30 - 9:00 AM, and went out and about in hot, sunny weather. I even wore this while putting makeup on a client in a hot, stuffy bathroom. I didn't take the foundation off 'til I got home around 7:00 PM that night. It lasted really well throughout the day, and I only touched up once with an oil-blotting sheet. I did use primer and a setting spray that day though.

Some of my "Pro's" are:
* Medium to full coverage. Buildable.
* Easy to apply and blend.
* Doesn't look cakey.
* Semi-matte, natural looking (skinlike) finish.
* Long lasting.
* SUPER lightweight. Feels like your skin!

A couple "Con's":
* The color range isn't the best. 10 shades but they're all too similar.
*Squeeze tube dispenser. Super messy!
* Price vs. Amount you get.
I've had other foundations with better packaging for the same price or less, and you get more out of it.

All in all, it's an awesome foundation and I would recommend it to anyone that has oily skin, would like a full-coverage foundation without it feeling "heavy" on your skin, and last a good amount of time with little to no "melting".

Until next time,
Abby

Wednesday, June 3, 2015

Tarte Brazilliance | Adventures in Self-Tanning

Well, I've done something completely out of the norm for me. I bought fake tan! And I'm really excited! For years, and years I've taken pride in being pasty white. I always thought I wouldn't look right tan, or that I would look "dirty" or "dingy". I think my newly healing mental state is making me more open to things I wouldn't have considered even a year ago. The past month or so has been really sunny and I've just been noticing more and more that I'm so white it's borderline blinding! So I decided to give fake tan a try and see how it looks!
To start off, a general thing with all fake tan is that you have to shave and exfoliate really well before applying, and with some brands they recommend moisturizing. I have pretty sensitive skin so I had to buy a specific shaving gel created to prevent "razor burn" or "bumps". And to be extra sure I made certain that the body scrub I bought said "soothing" on it. When I was done I applied a very light layer of lotion to my elbows, knees, ankles, and wrists and then wiped it off so it wouldn't affect the fake tan.
The fake tan I bought was the Tarte Brazilliance one, and it comes with a mitt to apply the fake tan with. This stuff looks terrifying when you first open it, but that's just the color guard and bronzer so you know where you've applied it so it won't go streaky. It's kind of feels like a gel formulation, and it smells fantastic! It's like molasses cookies or something along those lines. I love it!
Now, I've never tried fake tanner before, but the main thing I hear is that they smell horrendous. Especially as they develop and that's why a lot of people put them on at night and then sleep through it. But you don't have to with the Tarte one! They do say to stay out of/away from water while it's developing though.
I accidentally let this develop for 12 hours (instead of the recommended 8 hours), and by the time I rinsed off the color guard it wasn't dark enough for me. (That phrase itself just makes me laugh..) So I put on a second layer. When applying I would recommend getting a buddy to help with your back. I had my sister help me with mine. After I let the second layer of tan develop it was fine, but my legs just didn't seem to want to accept the fake tan. I even tried a third layer! I'm going to have to play around some with them next time I put it on. Other than my issue with my legs, I loved the color that I ended up being! I just wish I could achieve that level of tan naturally!
I never thought I would feel like this, but I'm really loving being tan! Whatever Tarte puts in their Brazilliance gives such a nice, even, natural looking color!
My fake tan lasted about a week before it started to fade. Only really on my body and legs though. My arms and back are fine. I think next time I won't go all over with it. I've also heard that getting some tan enhancers like Jergens in the medium/tan shades helps prolong the tan, so I'm going to try that too!
I also tried the tanning face towelette that came with the bottle, but I didn't expect much. I only used it so I could get a more accurate color match for foundation. I'm going to have to get a tinted moisturizer or BB Cream for days that I don't wear a full face of makeup.
 (Left: Before | Right: After)
The before picture is an old one, but I'm still just as pale, if not more.

A definite Pro of fake tanning (for me) is that it's so much easier to go out a buy foundation! It's amazing! Being so pale is definitely a struggle when you love makeup so much. Fake tan also aides in helping my rosacea blend too!
Tarte did an amazing job formulating this stuff! It's the perfect fake tan for pale girls that need some color without accidentally going orange, or having it look muddy or "BAM! In your face!" dark. It's a nice bronzed color. I love it!!
10/10 would recommend!

Until next time,
Abby

Monday, May 25, 2015

Fuji Green Tea | The Body Shop set

So pretty much everyone and their mother has been talking about this new line from The Body Shop, and now I know why! It smells so amazing! I decided to get a "gift set" so I could try a range of things from this line. It was $49 +shipping, and you get a full-size perfume and bath tea soak, and then mini versions of the scrub and body butter. All in all, a good deal for the price.

The Fuji Green Tea scent is so fresh and light and clean. It's perfect for Spring and Summer. The perfume description from the website says: "... Green tea, Bergamot, Lemon and Mandarin top notes with a floral heart of Camellia, Jasmine, and Violet." I don't know how they do it, but this combination is fan-freaking-tastic!
The body scrub is so nice. With a lot of body scrubs, they have an oil base, and my skin always feels so greasy after using them and not in a nice, moisturized way. The Fuji body scrub has a gel base, and it has just enough "grit" to the scrub so it doesn't feel like you're rubbing your skin raw.
(body scrub)

I think the body butter is one of my favorite things. It's creamy, smooth, easy to rub in, but it's still light-weight enough that it doesn't leave a greasy residue. I can apply this after the shower or a bath, and it soaks in quickly.
I've only tried the "Bath Tea Soak" once. It was different, but it was still nice. It made the whole bath smell like the line of products, but not overwhelmingly so. I think that has to be my favorite part of this entire line. It's a lovely scent that lingers but doesn't overpower. The only real issue I had with the tea soak is that it was hard to find a spot on my bathtub to hang the tea infuser off of. I would suggest that they make the chain a bit longer.
(bath tea soak)

I love this line so much that I hope it's permanent, and not a seasonal thing. I've nearly run out of my mini sized products that I'm wanting to get the full sizes. Plus back-ups!!

Until next time,
Abby

Tuesday, May 5, 2015

Celtic Druid | NYX Face Awards Entry 2015 | Product List

Hello, Everyone! Exciting news today! I'm entering the NYX Face Awards this year, and my entry video is finally done!!!! It took me hours to film, and literally days to edit, but it's done!
My video idea started with Celtic mythology. I was kind of basing it off of The Morrigan at first. She's the goddess of Death and Battle and is mostly associated with the Raven. But as the filming progressed it wasn't really shaping up at a "battle" theme or "death" theme. So it kind of transformed into a "druid" look. Or my interpretation of it, anyway.

Go watch my entry video HERE!

Product List
Face:
  • Smashbox HD Photo Finish Primer (sample)
  • NYX HD concealer | CW12 - Green
  • Kat von D "Lock It Tattoo Foundation - No. 42
  • NYX HD concealer | CW01 - Porcelain
  • Rimmel "Stay Matte" translucent powder
  • NYX blush - HDB22 "Taupe"
  • NYX blush - PB25 "Pinched"
  • THE BALM Mary Lou-Manizer
  • NYX Eyebrow Gel - EBG04 "Espresso"

"Woad Paint":
  • Prestige eyeliner pencil - E20 "Midnight"
  • Prestige liquid eyeliner - LE-11 "Azure"

Lips:
  • MAC lip liner pencil - "Nightmoth"
  • MAC L.E. lipstick - "Lingering Kiss"

Eyes:
  • Smashbox 24Hr Photo Finish Shadow Primer
  • NYX Jumbo Pencil - 627 "Cobalt"
  • NYX Jumbo Pencil - 601 "Black Bean"
  • NYX Single Eyeshadow - NMS10 "Underneath it All"
  • NYX Single Eyeshadow - NMS03  "In the Buff"
  • NYX Single Eyeshadow - NMS06 "Voyeur"
  • NYX Love in Paris Palette - LIP05 "Parisian Chic" (matte dark brown)
  • MAC Eyeshadow - Amber Lights
  • Mary Lou again (highlight)
  • Urban Decay 24/7 Velvet Eyeliner pencil - Black Velvet
  • L'Oreal Lineur Intense liquid eyeliner - Carbon Black
  • Maybelline "The Colossal Volume Express Cat Eyes" - Glam Black(W.P.)
  • Eyelure eyelashes - "Definition no.126"
I will be sure to keep you all up to date on my progress. The entry period is over on May 8th. There's no official "voting" just yet, but every "Like" on my YouTube video will count as a vote!

Until Next Time,
Abby


Saturday, April 18, 2015

SheaMoisture Purification Masque

When I got the news that ULTA was opening in my town I was ecstatic! When I got a job with them I was on cloud nine! There were so many products I wanted to try and play with!!! And this baby has become my golden goose!
I grabbed this hair mask on the off chance that it would work. My hair is the weirdest I know of. It's oily, coarse, thick, wavy and curly, with a sensitive, dry scalp that is very prone to dandruff. I can wash my hair and have dandruff the very next day. But with this mask it's about four days before my hair starts showing signs.

This mask has a very mild "grit" to it that I'm assuming is to exfoliate the scalp. (The package doesn't really say anything about that.) It has a base of Shea butter, coconut oil, and avocado among other moisturizing creams, oils, and butter. For medicinal purposes, it has salicylic acid, willow bark extract, and tea tree oil. It is extremely natural, and it says "homeopathic remedy"! It's made without a lot of icky things like parabens, phthalates, sulfates, and a lot of other crap that's bad for you.
It says to: "Apply generously to dampened hair, leave for 5-30 minutes and rinse thoroughly."
What I typically do is shampoo my hair and use this as a conditioner in rotation with my actual conditioner. My hair stylist has me using Paul Mitchell's tea tree line with lavender. She says it's clarifying yet soothing which is good for dandruff prone hair. The results with my conditioner isn't as long lasting as it is with the mask, but it still works.
The tub says it "Conditions hair while relieving dry, itchy and flaking scalp while regulating sebum production. Plantain Enzymes, clarifying Tea Tree Oil and Willow Bark Extract removes product buildup and strengthens hair by sealing in natural moisture." It does all that and more for me! Since I have a very sensitive scalp I have to be careful with the products I use on my hair. Certain things aggravate my dandruff, and some will even clog hair follicles and cause "acne" on my scalp. I've been using this mask for almost a month and nothing bad has happened! Only good!
Now, I know very little about hair care, but I would highly recommend this product, and line, to anyone! I haven't tried anything else by SheaMoisture, but I will be in the future! I'm always happy to find new products that are natural and work amazingly!
Until next time!
Abby

Monday, April 13, 2015

Hair Extensions for Beginners, Pt. 2 | Getting My Extensions Blended

Hey there! Sorry it's been so long since I posted Part 1!! I was being kind of paranoid about taking my extensions to just anyone to get them blended. And they needed to be blended let me tell you! When I first got them they came just above my butt, and they didn't blend very well with my hair natural.
(As stated in Part 1 my hair is naturally thick, coarse, and a mix between curly and wavy.)
I tried straightening my hair...and it worked a little better! But not much.
(My hair straightened. A little more believable, but not much more.)
So, I'd kinda been holding out for ULTA to open in my town. I'd gotten a job with them, and I was curious who would be working in the salon. When opening came my niece got her hair cut there by a stylist from Washington, and she did an amazing job! As soon as my niece was done with her hair cut I booked my appointment! And I'm so glad I did.
MacKenzie did an awesome job with my extensions. She told me to straighten my hair and extensions, clip them in how I would like them to be, and she would blend them into my real hair. She's got me going in for a regular trim at the end of the month, and she told me to come in the next day with my extensions in so she could see how it all looks, and she would fix anything that needed to be touched up!
(A little hard to see, because of the angle, but I can definitely tell it looks like my actual hair!)
All in all, you pretty much have to get extensions blended. I swear the girls on YouTube that claim they can just order them and clip them in..no. Not possible. My stylist even said so. There's no way a company can cut extensions to suit everybody's hair. Especially because they're pretty much cut straight across. My extensions now sit just a little bit above where they were before my hair cut. I told MacKenzie I wanted the least amount possible cut off, but if a little extra had to go to ensure a realistic blend, then so be it!
I love my extensions and would recommend them to pretty much anyone!! My only suggestion towards Bellami would be more of a shade range.
Again, the set of extensions I got were the Magnifica 240g 24" Hair Extensions in Mochaccino Brown (1C).
I hope this was informative for anyone as much of a beginner as myself, and a nice read for anyone else!
Until next time,
Abby.

Wednesday, January 7, 2015

Hair Extensions for Beginners, Pt. 1 | A Rundown of the Company and MyHair

Hey Everyone! Hope 2015 is going great for all of you!
To start with, this is not sponsored. I'm not being paid for this. I am a customer, and this is my honest opinion. I'm a complete beginner here as well. I've never tried extensions beyond those 1 clip wefts that Hot Topic and Claire's/Icing sell for little pops of color here and there.

I'd been contemplating buying extensions for a while now. My hair is very thick, and naturally an in between of wavy and curly. When I was a little girl my hair grew naturally in ringlet curls until is got too thick and weighted down. Today my hair is about mid-chest length. My want for hair extensions is partially for a costume idea I have, part for special occasions, and just an all around want of long hair. I did a lot of research online, websites and YouTube, and finally settled on Bellami Hair.

I didn't really need them for volume, but when it came to it for length there was only one option for it. The Bellami extensions are 100% natural, Remy human hair, and the wefts are thick all the way from top to bottom. They don't go all scraggly and thin at the ends.

I was a little wary when it came to the color choosing process because it's my natural hair color. I have extremely dark brown hair with a lot of red highlights and some (but not much) gold highlights. I was also a little apprehensive because the people I saw that ordered the color I did, it seemed like their extensions were so much darker than my hair. I kept going back and forth between 2 different colors before finally settling on one color. (Bellami also doesn't have the widest color range when it comes to choosing either.)

The really nice thing when it comes to choosing the right color for you is you can email a picture of yourself in natural lighting to the company, and they will evaluate it and tell you the closest color match. And even if it's not, when you get your package there's a "tester weft" that you can see if it matches before opening the larger package (which voids your return policy). If it doesn't match, then wrap up the "tester weft", contact the company, and mail it back for an exchange for the next color. If it does match, then keep the tester weft (because it's actually part of the set) and open them on up!! Not very many companies offer this testing service. So that was a definite pro when it came to choosing which company to go with.

I ordered them on New Years Day (that night), and they were shipped out by the next morning/afternoon. If you order before noon PST (Pacific Standard Time) they will ship your order that same day. It took 4 days total to get to me from California all the way up in Alaska!

So, that's it for now. I will post Part 2 after playing with my extensions a little more. (I've only had them for 2 days!) Photos included! Stay tuned!

Abby